 how-to
How to Maintain Mini Split Systems: 2026 Guide
Table of Contents
- Why Mini Split Maintenance Matters for Your Home
- Mini Split Filter Cleaning Frequency: The Monthly Habit That Saves You Money
- How to Clean Mini Split Coils Without Damaging Them
- Signs Your Mini Split Needs Service: When to Call a Professional
- Drainage System and Condensate Drain Maintenance
- Managing Humidity and Thermostat Settings for Efficiency
- Your Annual Mini Split Maintenance Schedule
- When to Call Air CareSaver for Professional Mini Split Service
- Frequently Asked Questions
Last Updated: October 3, 2026
Why Mini Split Maintenance Matters for Your Home
A mini split that never gets serviced loses efficiency long before it stops working. Clogged filters, dirty coils, and blocked drains force the compressor to run harder, raising energy use and shortening system life.
At Air CareSaver, we have spent over 21 years (license #1054832) servicing ductless systems across the San Gabriel Valley. Units that get routine care last years longer than those serviced only after they break.
Mini Split Filter Cleaning Frequency: The Monthly Habit That Saves You Money
Mini split filter cleaning frequency should be once a month during heavy use, every two to three months in lighter seasons. It is the easiest task in the routine and has the biggest effect on airflow and efficiency.
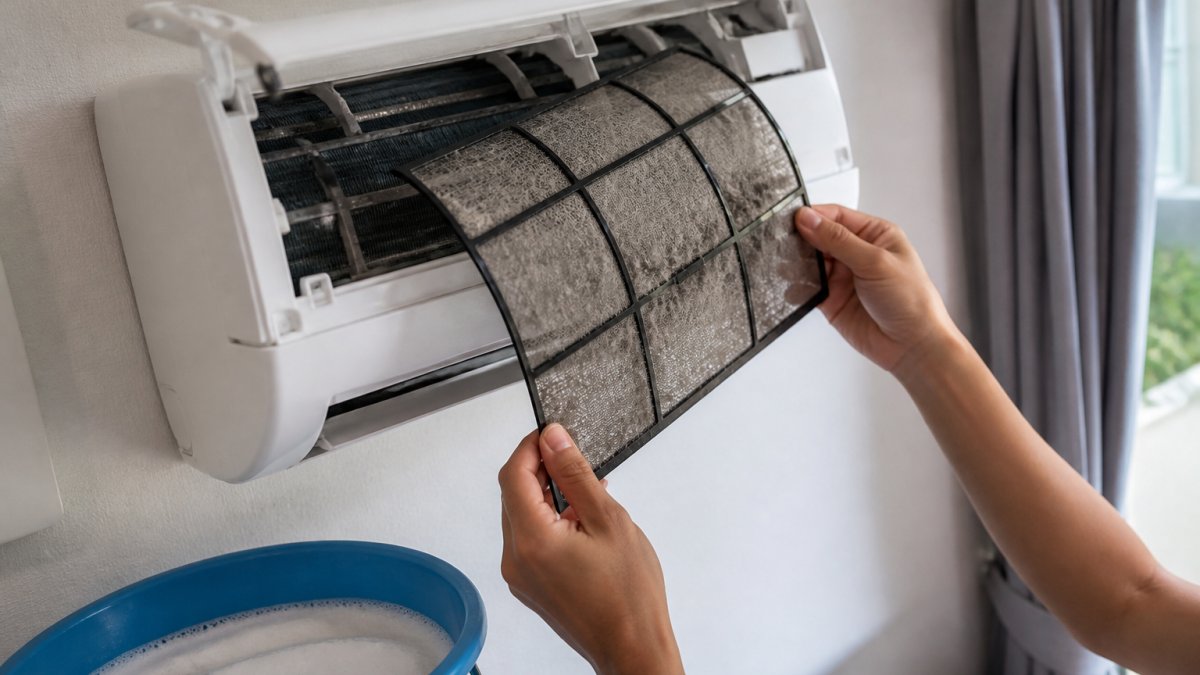
How to Remove and Wash Your Filters
- Turn the unit off at the thermostat or remote.
- Lift the front panel until it clicks into the open position.
- Slide each filter out by its tab. Most units have two.
- Rinse with lukewarm water. Use a soft brush for stubborn dust.
- Let them air dry completely. Never put them back damp.
- Slide them back in and close the panel.
Signs Your Filter Needs Attention Sooner
- Visible gray dust on the mesh
- Weak airflow from the vents
- A musty smell when the unit starts
If you see any of these, clean the filter today rather than waiting for the calendar.
How to Clean Mini Split Coils Without Damaging Them
How to clean mini split coils comes down to one rule: be gentle. Evaporator fins are thin aluminum, often 0.004 to 0.006 inches thick, and bend the moment you press too hard. Bent fins block airflow and cut efficiency.
The two coils need different treatment:
- Indoor evaporator coil, behind the filters in the wall head. Collects dust, pet dander, and biological film because it stays wet during cooling season.
- Outdoor condenser coil, wrapped around the outdoor unit. Collects pollen, grass clippings, and cottonwood fluff; usually cleaned from the outside in with a garden hose on low pressure.
U.S. Department of Energy guide to home cooling
Tools and Supplies You'll Need
- Soft coil brush or a vacuum with a brush attachment
- Coil-safe foaming cleaner (no-rinse or rinseable, check the label)
- Fin comb sized to your coil's fins per inch (commonly 14 to 20 FPI on residential mini splits)
Step-by-Step Coil Cleaning Process
- Cut power at the breaker. Not just the remote, the disconnect at the panel. The indoor unit still has line voltage at the control board.
- Open the front panel and remove the filters. Set them aside to wash separately.
- Inspect the coil before you touch it. Look for matted dust, gray biofilm, or bent fins. If heavily fouled, plan on a second pass.
- Vacuum loose dust off the coil with a brush attachment, working top to bottom so debris falls into the drain pan.
- Spray coil cleaner and let it sit per the label. Most foaming cleaners need 5 to 10 minutes to lift biofilm. Do not let it dry on the coil.
- Rinse gently. Use a pump sprayer or hose on the lowest setting, angled with the fins, not perpendicular.
- Flush the drain pan. Pour warm water through it and confirm it drains freely.
- Straighten bent fins with the comb, one row at a time, matching tooth spacing to the coil's FPI.
- Let everything dry, then replace the filters. Run fan-only mode for 15 minutes to push residual moisture out.
What Most Homeowners Miss: The Blower Wheel Behind the Coil
The blower wheel sits just behind the evaporator coil and is the most neglected part of a mini split. Hidden from view, it collects dust and biofilm until airflow drops.
Cleaning the blower wheel requires removing the indoor unit's cover and sometimes the coil, a job for a technician. Slow the buildup by keeping filters clean and running fan-only mode for 10 minutes after each cooling cycle in humid weather.
How Often to Clean the Coil
- Indoor evaporator coil: every 6 months in normal use, every 3 months if you have pets, smoke indoors, or live in a dusty area.
- Outdoor condenser coil: once a year, ideally in spring before cooling season, and again after pollen season if you see visible buildup.
If you are not comfortable removing panels or working around line voltage, stop at the filter and drain pan and book a professional coil cleaning. The cost of a bent coil is far higher than the cost of the service.
Signs Your Mini Split Needs Service: When to Call a Professional
Signs your mini split needs service usually show up as changes in sound, airflow, or cooling.
Watch for:
- Ice accumulation on the indoor unit or refrigerant lines
- Water dripping from the indoor head
- Grinding or rattling from the blower wheel
Any of these point to a problem beyond routine cleaning. Refrigerant leaks, compressor faults, and control board failures need diagnostic tools and a licensed HVAC technician.
Drainage System and Condensate Drain Maintenance
A clogged condensate drain is the most common cause of water damage from a mini split. The indoor unit pulls moisture from the air, and when the drain pan or line clogs, that water ends up on your wall or floor.
EPA guidance on indoor air quality and moisture control
To keep the drain clear:
- Locate the drain line exit outside or at the drain point.
- Check the drain pan under the indoor coil for standing water.
- Flush the line with warm water or a wet/dry vacuum.
- Look for slime or algae buildup and clear it out.
- Test by running the unit in cool mode for 15 minutes.
Do this a few times a year, especially in humid months. In the San Gabriel Valley, summer humidity makes algae growth in drain lines a real problem.
Managing Humidity and Thermostat Settings for Efficiency
Relative humidity above 60% makes a room feel warmer than the thermostat says. Mini splits dehumidify as part of cooling, but only if they run long enough to do it.
Smart thermostat settings help here:
- Set cooling to 75-78°F when you are home in summer
- Raise it 4-7°F when you are away
- Avoid constant on-off cycling, which kills dehumidification
A smart thermostat also tracks energy consumption and spots problems early. If usage climbs with no change in settings, something is working harder than it should.
Your Annual Mini Split Maintenance Schedule
A written schedule keeps small tasks from becoming big repairs. Here is the routine we recommend, organized by who does it and how often.
The Monthly vs. Annual Checklist
| Task | Frequency | Who Does It | Why It Matters |
|---|---|---|---|
| Clean or replace filters | Monthly in heavy use | Homeowner | Restores airflow; protects the coil from dust loading |
| Inspect drain pan and line | Every 2-3 months | Homeowner | Prevents water damage and algae clogs |
| Clear debris around outdoor unit | Monthly in spring/fall | Homeowner | Maintains condenser airflow and efficiency |
| Clean evaporator coil | Every 6 months | Homeowner or pro | Removes biofilm that cuts cooling capacity |
| Flush condensate drain | Every 3 months in humid season | Homeowner | Stops the #1 cause of indoor water leaks |
| Check refrigerant lines for frost or oil | Annually | Homeowner visual, pro if suspect | Early leak detection before compressor damage |
| Deep clean blower wheel | Annually | HVAC technician | Restores airflow and stops wobble noise |
| Test defrost cycle in heat mode | Annually before winter | HVAC technician | Prevents outdoor coil freeze-up |
| Full system inspection and refrigerant charge check | Annually | HVAC technician | Catches small faults before they become failures |
Spring and Summer Checklist
- Clean filters before the first hot week
- Flush the condensate drain with warm water
- Clear debris around the outdoor unit, leaves, grass, and cottonwood fluff are the top airflow blockers
Fall and Winter Checklist
- Clean filters again before heating season
- Check the outdoor unit for leaves and ice
- Test heat mode and confirm the defrost cycle runs, the outdoor fan should stop and steam rise from the coil
How to Prioritize If You Only Do Three Things
If the full schedule feels like too much, these three prevent most breakdowns we see:
- Clean the filters monthly during heavy use. The single highest-return task.
- Flush the condensate drain every three months in humid weather. Water damage is the most expensive preventable failure.
- Book one professional service per year. A technician cleans the blower wheel, checks refrigerant charge, and tests the defrost cycle, none of which a homeowner can do safely.
Seasonal Startup and Shutdown Procedures
Startup (first hot week):
- Clean filters and confirm they are fully dry.
- Run fan-only mode for 15 minutes to clear winter dust.
- Switch to cool mode and set the thermostat 5°F below room temperature.
- Confirm the outdoor unit starts, the indoor fan runs, and the drain line drips within 10 minutes.
- Check for unusual noise or vibration at both units.
Shutdown (end of cooling season):
- Run fan-only mode for 30 minutes to dry the coil and drain pan.
- Clean the filters one last time.
- If your unit has a disconnect, switch it off at the breaker for the off-season.
- Cover the outdoor unit only if your manufacturer allows it, some units need airflow to prevent condensation.
What a Professional Annual Visit Should Include
When you book a tune-up, ask what is included. A thorough visit should cover:
- Blower wheel deep clean
- Evaporator and condenser coil inspection
- Refrigerant charge check with manifold gauges
If a company only cleans the filter and calls it a tune-up, find another company. That is a filter change, not maintenance.
When to Call Air CareSaver for Professional Mini Split Service
DIY maintenance covers filters, drains, and light coil cleaning. Everything else, refrigerant leaks, compressor issues, recurring error codes, needs a licensed technician. That is where Air CareSaver comes in.
We are family owned and operated, licensed (#1054832), and have served the San Gabriel Valley for over 21 years. Our team offers same-day response, free estimates, and accurate diagnostics that avoid unnecessary parts or guesswork, plus preventative maintenance plans that keep your system running efficiently year-round.
If your mini split is icing up, leaking, or just not cooling like it used to, do not wait for it to fail completely.
Your mini split will tell you when something is wrong.
Frequently Asked Questions
How often should I clean my mini split filters?
Clean your mini split filters every two to four weeks during heavy use, and at least monthly in moderate seasons. Homes with pets, high dust, or nearby construction may need weekly cleaning. Clogged filters restrict airflow, forcing the system to work harder and raising energy consumption. A quick rinse with water and mild soap keeps airflow strong and protects the blower wheel and evaporator coils from dirt buildup.
Can I clean my mini split coils myself?
You can clean accessible coil fins on the indoor unit using a soft brush and coil cleaner, but the outdoor condenser coils and refrigerant components require a licensed technician. Never spray water directly into the indoor unit's electrical areas. If you see bent coil fins, ice accumulation, or refrigerant residue, stop and call a professional. Air CareSaver handles deep coil cleaning and refrigerant checks safely.
What happens if you don't maintain a mini split system?
Skipping maintenance leads to restricted airflow, frozen evaporator coils, and a clogged condensate drain that can cause water damage. The compressor works harder, energy consumption climbs, and the system may shut down during peak summer heat. Over time, neglect shortens the unit's lifespan, often from 15 years down to 10 or fewer. Regular filter cleaning, coil care, and annual inspections prevent these expensive failures.
Do mini split systems need professional maintenance every year?
Yes. An annual professional inspection catches refrigerant leaks, checks electrical connections, verifies thermostat settings, and cleans components you cannot safely reach. Technicians also test system balancing and airflow to confirm the unit runs at its rated efficiency. Pair annual service with monthly DIY maintenance, and your mini split will deliver consistent comfort and lower utility bills for years.